Eyes. The communication through them is memorizing. The lack is empty, painful, and lifeless.
Now, eyes have always been a strange phenomena for me. I often find myself trying to look people in both eyes during a conversation, and getting frustrated that my eyes really can only focus on one eye at a time. So, I find myself trying to figure out which eye is the person's dominant eye.. and trying to focus on looking into that one eye. Yes, I do realize that people who come into contact with me on a face-to-face daily basis will probably be scrutinizing what eye of theirs I am looking at.. but I digress. Back to the focus - eyes have always been a part of the body I find captivating :)
I began thinking more about eyes months ago based on the inspiration of my kids. I often spend time looking into my children's eyes. This happens while cuddling with them before naps, after, or simply while we are together. With my older kids we can look at each other and just start laughing. Without words we can pass "communications" between one another that I consider to be jokes. Surprisingly, Anja and I are developing the same communications. I have been amazed at how she is already "joking," and that we both can look at each other and laugh. It is amazing.
There is so much said beyond the laughter. There is a connection that comes with simply being quiet and looking into one another's eyes. I notice how powerful simply taking an extra minute to simply be together and look at one another can help me feel more connected to my kids, and them to me.
About a month and a half ago we experienced the opposite to be true.
I have heard people talk about experiencing a person who is just not there. While I never questioned for a minute the reality of the situation, I never experienced it.
Then came a Wednesday that began like any other day of the week. Anja was a bit crabby, teething, and had a low-grade fever. It went up to 102, and came down with medicine. Later, when Jon had the kids with me at work, her fever came back, but she was happy.
Then came the change.
She was staring off. Despite my efforts, with eyes wide open Anja was not registering or responding to me.
For the next 5 hours she seized, eyes wide open. He stare was blank. Her stare was empty. Yet, there seemed to be something in there needing me. I stayed near her head. I talked to her, kissed her, sucked her little fingers as she likes me to when she is playing while nursing her, and just was there. We wondered if we would every "see" her again - let alone whether she would live.
Those hours were the scariest hours of my life. What I had just been marveling at with my children seemed to be held at bay for me with Anja.
At 3:30am, while wheeling her to her room after the seizures stopped, the cart hit a bump. It roused her, drugged and all, and she "looked" at us... she responded, she showed she knew us. We knew we had her back in that regard. To use the word celebrate is to cheapen the emotions that coursed through us.
I don't know how eyes can say so much, and I marvel at this. For me, this is a part of creation that speaks so powerfully into my belief that God exists and is so intentional. To try to explain in words is something that cannot be done. The knowing comes through the experiencing.
Each day I get to experience the eyes of my children (and many others too.. but they have been the ones I have been thinking about the most in terms of how much is said through the eyes). It is a gift. It is an experience that is so life-giving for both parties.
I hope you will take the time to look into the eyes of those in your life today, and just experience the connection that comes without words.
Saturday, December 21, 2013
Thursday, October 17, 2013
My worst can be my best
In my senior year of college I decided to take The History of the American English Language for fun. I still remember sitting in the chair and debating over whether this extra class was worth it (I was a math major). When the professor, Dr. Glyer, opened us in prayer, I was hooked. It ended up being one of my favorite classes, and she one of my favorite professors.
At one point in the course we were peer-reviewing one another's papers in groups of 4. We had all read a girl's paper and were supposed to engage in dialogue about her strengths and weaknesses regarding the paper. We all agreed that her strengths were in the introductory sentence of each paragraph that connected the last paragraph to the new paragraph. I sat surprised when she told us that this was her greatest weakness in writing. Her greatest insecurity, to us, was her greatest feature.
Fast forward to a week or so ago.
As I was driving through town without children - a luxury :) - I was thinking about my insecurities. I was thinking about how I feel insecure in knowing how to be a good mom. I feel insecure in knowing how to be intentional with my time, and to really know how to listen to my children and make them feel understood while also challenging them to grow. I feel insecure in SO many things regarding my kids.
Well, my memory took a turn towards Dr. Glyer's class and the girl who struggled with her sentences. If you know me well, you know my brain kind of jumps. The jumps always make sense - well, to me atleast :) So, it jumped a few times and landed on the memory from Dr. Glyer's class. When I thought about this girl I was so encouraged. She took extra time to focus on her weakness and to work on growing. While she felt incredibly insecure about her sentences, we all, as outsiders, applauded this very aspect of her writing. If to others her weaknesses were viewed as strengths, maybe one day mine may be viewed the same.
It is easy to look at my own shortcomings and become discouraged. I see myself in a specific light, and assume others do as well. I am encouraged to keep working on my weaknesses, and to trust God that He is making me strong. I am encouraged that maybe these things that I struggle with may also be viewed as strengths and blessings to others. Remembering that girls inspired me to continue on, instead of getting lost in the sorrow of it all.
I'm glad I stayed in that class. The class itself was awesome, but the impact of that girl, and the continued inspiration I have experienced in knowing Dr. Glyer have been more than I could have imagined.
Tuesday, October 8, 2013
Boys and Girls
Compassion, critical thinking, humor, empathy, gentleness, being brave, taking risks, saying you are sorry, making things right, showing your feelings by crying, talking things out, getting out physical aggression, holding someone's hand when they are hurting.
This is a very short list of choices, activities, expressions, and characteristics that I personally value.
I hope my kids will practice/live/experience all of these.
However, they don't live in a society that encourages them equally. We live in a culture where boys and girls are "gendered" based on characteristics such as these. Girls are to be quiet, sensitive, compassionate, and gentle. Boys are to be loud, domineering, good with their hands, can think in 3 dimensional pics (yes, I have heard this.. and I am a girl who can think in 3d objects and rotate them in my head), and need to be brave. To be a good girl or boy is to stick to the stereotypes and not cross over.
While boys and girls can be different, I often struggle when I hear people talking about "all boys" or "all girls" being "insert defining expression." It drives me crazy. One, two, or all of my kids often do not fall into the stereotype. Yet, that adult, and even that kid who really has no idea what they are talking about, voice their comment and alienate others, and make others feel less than for things about themselves. Is it an inferiority complex? Is it the need to feel better about yourself by defining who you are not?
I wonder how many of our current issues with suicide, self-harm, etc. have a root in someone telling/showing a kid how they were somehow wrong in who they were based on a characteristic. Maybe it was a little boy who was told he was too sensitive like a girl. Maybe it was a little girl who was told she was too loud for being a girl.
I see and hear the same things in my current season of life. I see and hear how dad's have to "watch" their kids, and are referred to almost as babysitters. Moms and even people outside of this season of life often look on fathers with extra sympathy if they have to take care of the kids alone - without the mom around. In many ways, men are looked at as being inferior. Many men seem to distance themselves emotionally from their kids. If a mom is staying at home, and the dad is working, I can see how the dad may not be "in" on how everything goes down during the day. However, aren't they both parents?
I already see how my son, especially, is being hurt by society when it comes to gender issues. His favorite color is pink. It makes me hurt for him and angry when I hear a little girl or boy tell him it is a "girl" color... and then I am furious at the parents who either encourage it, or just let it be. He nursed his Gerry when I was nursing Lina. I have heard many people comment on how "instinctive" it is for little girls to do this, but not for little boys. He likes fingernail polish on his toes - that was actually a struggle for us as parents. Jon and I had a long and good talk about that issue. How do you respond to others who give your child a look, stare openly, and even comment out loud - and I am not even talking about kids! Where do you protect your child, and help them learn to forgive the people who hurt them and be confident in who they are?
One thing we are learning with our kids is that they are different, and they are very much the same. We are choosing to teach them to live out who they are, and to work towards having characteristics that enable them to love others and themselves better - even if society may come at them because they aren't being a "boy" or "girl" in the way that is deemed appropriate.
When I am tempted to "gender" my kids, I often stop myself and think it through. I hope I continue to do this, and that Jon and I do a good job in encouraging our kids to be who they are, to embody characteristics that help them love themselves and others better, to accept others for who they are even if it is different from them, and to stand up for others who can't do it for themselves when someone tries to tell them how they aren't valuable.
Saturday, August 24, 2013
When we die...
It all began one day when we were driving by a cemetery. Ezzie asked me what all of the rocks were. I explained that when people die, they are put in the ground and the rock shows us where they are. He was upset by this, and told me he didn't think people should be put there when they died. I then asked him where they should be put. He didn't know, so I told him that they could be put in the street and other areas. He was ok with that idea until I explained that we would run over them with our cars. He then thought the burying idea was the better option. Yes, that is how I reasoned that one - I do love the age of 4 where logic is understood - well, sometimes :)
Since then, Ezzie talks about death fairly regularly. He is definitely this mama's boy. He, like me, when tired, sad, or simply off, finds himself walking down the alleys of melancholy and sad thoughts. Jon frequently is talking me through sadness, fear, and grief at night, and now I am doing the same for my boy.
So, death. It is a topic. It is hard, and it is good.
Last night was the clincher of conversations. As Ezzie told me he didn't want to live with Jesus, because he wouldn't be with us, he told me how he never wanted to be apart from me. As he spoke, I replied back the same with words and tears. We talked about things relating to death and heaven and such, and we both agreed that death was sad, but we both shared the happiness in being free from getting our feelings hurt, experiencing being really angry and mad, and the emotions we both can understand about one another.
I walked away with tears still left in my eyes and such a full heart. This is what being a parent is about. This is the trust I want with my kids. I want them to be able to talk to me about anything without the fear of being judged, ridiculed, lectured at, or feeling silly. While I am mommy, and they do need to obey and respect me, I am also mommy who invites them in and allows them their space to be themselves and make their own choices. It is a strange dynamic at times, while it is also so natural.
Death will continue to be a discussion, as will other hard topics, and I welcome them. Not because I have anything important to say, but because I get to journey with my kids. Jon gets to journey with them. We get to be close in heart and spirit - not just body and behavior.


Friday, August 23, 2013
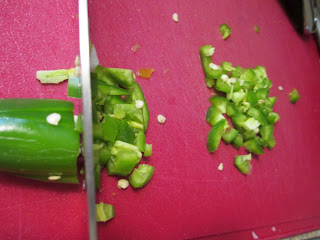
Jalapenos - Go Gloveless!
A few years ago I found myself cutting a bunch of jalapenos. As I was cutting through them all I had no idea about the fate awaiting my gloveless hands. My hands burned... I woke up throughout the night because of the pain.
I have avoided cutting them since. When I have had one to cut, I've just done a few big chops without touching the fleshy green. I don't keep gloves on me, forget to grab them at the store, and simply don't want to spend the money if I don't have to.
About a month ago I discovered how to dice a jalapeno without using gloves, and without burning my fingers. Not a single tinge of pain entered my fingertips.
Maybe this technique is commonly known, but just in case it isn't, and you don't want to bother with gloves either, this is for you!
First, position your jalapeno on your cutting board - only hold the stem.
 Take your knife and make slices beginning close to the stem, and move the knife through the tip. Continue holding the stem.
 Rotate the jalapeno 90 degrees either direction. Make similar slices just as you did before.
 Now, begin cutting so your knife is running vertically (all while continuing to hold the stem). You will have perfectly diced jalapenos and not a bit of burn on your gloveless hands! Happy cutting!
I have avoided cutting them since. When I have had one to cut, I've just done a few big chops without touching the fleshy green. I don't keep gloves on me, forget to grab them at the store, and simply don't want to spend the money if I don't have to.
About a month ago I discovered how to dice a jalapeno without using gloves, and without burning my fingers. Not a single tinge of pain entered my fingertips.
Maybe this technique is commonly known, but just in case it isn't, and you don't want to bother with gloves either, this is for you!
First, position your jalapeno on your cutting board - only hold the stem.


Monday, August 5, 2013
Lemon Bars - Irresistible!
So... without further adieu - here is the recipe. My mom made these for us growing up. These lemon bars, in addition to the no bake cookies and zebra brownies, were my favorite treat. I don't know where she discovered this recipe, but I am sure glad she did and shared them with me.
They aren't the healthiest, but they are incredible in flavor and texture. I recommend changing nothing about the recipe.
Lemon Bars
Ingredients:
(Crust)
- 2 C Flour
- 1/2 C Powdered Sugar
- 1 C Butter
(Lemon amazingness)
- 4 Eggs
- 2 C Granulated Sugar
- 1/3 C Fresh Lemon Juice
- Pinch of Lemon Zest
- 1/4 C Flour
- 1/2 t Baking Powder
(Topping)
- Powdered Sugar
Preheat oven to 350
Mix the first 3 ingredients together - either cut in by hand, or use a mixer (I did this - so much easier!)
 The texture will be like the sand at the beach.
 Before placing it in the 9x13 pan, use the paper from the butter, and grease the pan (thanks Mom for this gem of cooking wisdom!). Now pat the mixture down. Gorgeous!

 Bake for 20-25 min. Keep an eye on the crust. It should begin developing a golden brown edge. My oven took 18 minutes due to it cooking hot (it is a gas stove). Remove from the oven.
 While your pastry is baking, combine all lemon layer ingredients into your mixer, or bowl if you are using a hand mixer. Mix until there is a slight froth. After removing the pastry from the oven, pour the mixture onto the hot pastry.


 Place back in the oven for 25 minutes. My oven took 20 minutes. You will want the top to develop a nice browning. It will look overcooked, but don't be fooled!
 Immediately, sprinkle with powdered sugar - notice the beautiful snow white against the golden yellow and brown.

 Once cooled enjoy - yes, it is best to wait for it to cool... it is so so so hard!
The pastry will be light and flaky. You will notice that the lemon layer is bright and zings your taste buds ever so gently. The lemon layer should be ever so smooth. The browned top should crumble similar to a creme brule, but more tenderly. You may have to fight yourself to not eat another piece.. just try to share :)

They aren't the healthiest, but they are incredible in flavor and texture. I recommend changing nothing about the recipe.
Lemon Bars
Ingredients:
(Crust)
- 2 C Flour
- 1/2 C Powdered Sugar
- 1 C Butter
(Lemon amazingness)
- 4 Eggs
- 2 C Granulated Sugar
- 1/3 C Fresh Lemon Juice
- Pinch of Lemon Zest
- 1/4 C Flour
- 1/2 t Baking Powder
(Topping)
- Powdered Sugar
Preheat oven to 350
Mix the first 3 ingredients together - either cut in by hand, or use a mixer (I did this - so much easier!)


The pastry will be light and flaky. You will notice that the lemon layer is bright and zings your taste buds ever so gently. The lemon layer should be ever so smooth. The browned top should crumble similar to a creme brule, but more tenderly. You may have to fight yourself to not eat another piece.. just try to share :)

Monday, July 29, 2013
I wish Target was my closet...
When I was younger I remember wishing a store could be my closet. Everyday I could just walk in and pick my outfit, and that would be that. I kind of forgot about that wish until today... when I was walking around Target trying to find collared blouses for my girls' costumes for the Scandinavian Festival.
I literally had to walk away from the baby clothes... oh my goodness. I don't go to Target nearly as often as I used to. Mainly due to having 3 kids, and because it is a financially tempting place... and we can't afford it. I wanted to grab so many outfits for Anja - they are ridiculously cute. My dream of having a store for my closet came swooshing in as I wished I could have Target as my kids' closets. If money were not an issue, I think I would have a shopping addiction - especially for little girl clothing.
As I left Target I thought about what I had been doing.. making clothes for my girls'. My mom used to make me really cute clothes when I was little. She has been my inspiration for me to try sewing clothes for my girls... clothes scare me... I can create my own sewing inventions and confidently go to it.. but clothes make those rings around my armpits glow.
But... I was really proud of myself. I made the girls' dresses for the Scandinavian Festival we are heading to in August.


I even made Lina a summer dress recently! I have had to make alterations (umm.. clothing is intimidating, I can't say that enough!), but I think they turned out!

So, when Target is too cute, and our belts are too tight, I will go to my fabric stash and try to make something else. It may not be as cute, but it will be cute - hopefully :)
Tuesday, July 16, 2013
When you know it is good...
I love me a good deal. When I saw large mangoes at Kroger for 3 for 99c last week I was very excited. When I checked them out, I saw they were in great condition, and was even more excited. (Today I actually returned to get a few more mangoes before the sale ends tomorrow - it is rare to find them this inexpensive!).
So, naturally I posted about the great sale, and set to work on making something delicious. I had seen a post about a mango and lime sorbet, and after being saddened by not having any lime on hand, I changed my thinking and thought about the ingredients we had on hand.
I began by cutting up two large mangoes. I then wanted to add some coconut, but we had just finished our can of coconut milk last week. However, I had some creme de coconut on hand from making myself some tropical treats.

Before adding the creme de coconut, I knew I needed a liquid source. We had apple juice, but I wanted something better. We also had pineapple juice - the 100% not from concentrate kind. Score!
So, I put 2 6-oz cans into the mix and 2 spoonfuls of the creme de coconut. I blended the mix.. and tasted a bit (I had to use self-restraint here!).

Then to the refrigerator the mix went while Jon and I both ran 2 miles at the park with the kids.
When we returned I pulled out the mixture that had been left in the blender container, remixed it, and poured it into our icecream maker. Jon went about bathing the older kids and getting them ready for bed while I prepped Anja for bed.
About 20 minutes later we returned to our sorbet.

You know you made something awesome when the first words out of your husband's words are - " What did you put in this? It is freakin amazing!" - and I didn't even have to ask what he thought.
You are even more affirmed when your 4 year-old keeps licking his bowl even after he already cleaned it.

So, I would highly recommend this recipe. Enjoy!
Mango Pineapple Coconut Sorbet
- 2 large mangoes cut up
- 2 6-oz cans 100% not from concentrate pineapple juice
- 2 spoonfuls of creme de coconut
Mix all ingredients in a blender. Put in fridge to cool (this helps the mixture freeze faster). Remove from fridge and reblend simply to mix everything back up. Pour in icecream maker and keep an eye on it until the mixture is frozen. Enjoy - and try to not eat too much! This makes about 5 individual portions (~1 cup each).
Sunday, July 14, 2013
Lemon Honey Popsicles
A few weeks back I noticed 2 lone lemons laying in my fruit bin. They were so sad and pitiful, and so I knew they needed a purpose in their lives. Since it is summer, I knew exactly what they should be turned into: popsicles.
Though Jon and I haven't determined exactly how our sugar life looks these days, we have come to agree that the use of raw honey is one of the better types of sugar to use. While I don't care for the flavor of honey in my coffee, I love the flavor of honey in my tea and when partnered with lemons. So, in partnering with the concept of lemonade as a simple lemon juice-sugar-water mix, I came up with this recipe.
Now, I am a math girl, but I totally botched the end amount this recipe would make. I didn't realize I only had enough for 3 popsicles until after I poured the golden liquid into the molds... and I didn't really care to make a mess by pouring out and adding more water, didn't have any more lemons, and didn't know if adding water would make the recipe too watery... yeah, umm.. about that.
But, they turned out amazing. I think I discovered the perfect ratio - the golden ration! I was glad Jon didn't care to try one (he isn't a popsicle kind of guy), because I loved them.. and I was really glad when Lina couldn't finish hers because it was too big, because mama got to finish it :)
So, here is my throw-together recipe with the use of 2 lemons. Overall, I believe the main thing is to have equal parts of lemon juice and honey.
Lemon Honey Popsicles - The Golden Ratio
- 2 lemons (soft and juicy!)
- equal parts honey for amount of juice
- 2/3C water (or 2 parts water to your 1 part golden liquid)

Juice your lemons (notice my handy-dandy juicer.. you really should invest in one!) Then add your honey. Try to add equal parts honey to your lemon juice


 Add water to make 2 parts water to 1 part liquid goal. Then fill up your popsicle molds.

 Share with your kids.. really, sharing is caring, right?
 Then, enjoy your own :)
 Anja got a lick, and will get hers later when I feed her - I do it for the children :)

Though Jon and I haven't determined exactly how our sugar life looks these days, we have come to agree that the use of raw honey is one of the better types of sugar to use. While I don't care for the flavor of honey in my coffee, I love the flavor of honey in my tea and when partnered with lemons. So, in partnering with the concept of lemonade as a simple lemon juice-sugar-water mix, I came up with this recipe.
Now, I am a math girl, but I totally botched the end amount this recipe would make. I didn't realize I only had enough for 3 popsicles until after I poured the golden liquid into the molds... and I didn't really care to make a mess by pouring out and adding more water, didn't have any more lemons, and didn't know if adding water would make the recipe too watery... yeah, umm.. about that.
But, they turned out amazing. I think I discovered the perfect ratio - the golden ration! I was glad Jon didn't care to try one (he isn't a popsicle kind of guy), because I loved them.. and I was really glad when Lina couldn't finish hers because it was too big, because mama got to finish it :)
So, here is my throw-together recipe with the use of 2 lemons. Overall, I believe the main thing is to have equal parts of lemon juice and honey.
Lemon Honey Popsicles - The Golden Ratio
- 2 lemons (soft and juicy!)
- equal parts honey for amount of juice
- 2/3C water (or 2 parts water to your 1 part golden liquid)

Juice your lemons (notice my handy-dandy juicer.. you really should invest in one!) Then add your honey. Try to add equal parts honey to your lemon juice


Saturday, July 6, 2013
Tomato, Basil and Chicken Linguine!
Yes, we do have a lot of basil. Our plants have proved to be great producers, and it looks like my thumb is growing a green tint :)
Our tomatoes, while abundant in number, have paused in their ripening. Until the heat wave rolled through we had anywhere from 2-6 tomatoes ripened each day. We got our first red tomato in 2 weeks today. Jon and I both missed it, but Ezzie caught it. He brought it in to me as a special gift just for me - I love his sweet heart.
So, tonight's dinner was inspired by a pinterest post that only had pictures attached. I went ahead and purchased tomatoes at Kroger. They happened to be local, and if you look at the pic, amazingly gorgeous!
So, here is the recipe we discovered tonight that we absolutely loved. It reminded me of a true Italian dish. When I traveled to Italy back in 2005 I was surprised by how Italian food tasted very different from "Italian" food here in the states. A key difference I found was in the Italians' use of fresh ingredients, including herbs, and not having many processed items in their cooking. If you enjoy tomatoes and basil, you may find yourself falling for this recipe too :)

The ingredients:
- 1lb Linguini, or other pasta
- Extra virgin olive oil
- 1lb boneless skinless chicken
- Salt and pepper to taste
- 3 garlic cloves, minced
- 4 amazing tomatoes, or how every many you want!
- A bunch of basil - about 1 C loose leaves
- 1/4 C butter sliced
- Grated parmesan, if desired
- A touch of sea salt at the end, if desired
Step 1: Begin to boil your water for pasta now, and prepare your pasta as you go. For the heart of the meal, in a nice pan, heat oil over M or ML heat. Then add minced garlic. We love our mincer! Allow to heat just until fragrant, and then add your chicken.


Step 2: Cook chicken until browned, and then flip and cook the other side until the chicken is thoroughly cooked. Then add chopped tomatoes. Stir and allow the juices to bubble. Allow to cook for about 2-3 minutes.

Step 3: Add the basil and inhale! If you have a handy chicken spoon holder, or pig as some members of our family received one Christmas, place your spoon there after stirring and just stand and breathe in the goodness!

Step 4: Add in your butter, and turn heat to high. Get a good boil going on and cook for another 2-3 minutes to meld the flavors.

Step 5: Drain and add in the pasta that is al dente. Allow to boil for about 2-3 minutes until there is just a small amount of liquid in the pant. Turn off the heat and mix as needed while you allow the mixture to cool enough for the sauce to begin clinging to the pasta.

Step 6: Grate fresh parmesan over your amazing pasta.

Add a sprinkle of sea salt if you like (it really brightens the flavors!), and enjoy!

Friday, July 5, 2013
When life gives you lemons...
About a year ago I was at Kroger and I came across an amazing deal. They had bags of lemons for only 99c! People who know me well would not be shocked that I told the old woman buying produce next to me, told the next person I ran into at the bread section, and the woman behind me in line about this amazing deal. Everyone looked at me strangely - I don't think they appreciate good deals :) Not wanting to be a hoarder and wanting to let others in on the deal I didn't grab every bag. However I did come home with a lot of lemons.
One of my favorite desserts of all times is lemon bars. While we are definitely taking baby steps in changing our health patterns (we recently began running... and have actually been doing well with exercise!), this is one recipe I will not be altering or looking for a new recipe with. This is a tried and true recipe my mom introduced me to. I plan onforcing giving this to my children, and making sure my grandkids feast on them (and if we never have grandkids.. then someone :)).
Even with making my lemon bars, which my college friends love... just letting you know they are *that* good, I still had plenty of lemons left over. I looked up storing lemon juice and discovered that you can store the zest too. I love using zest in recipes, and thought this was brilliant.
So, I went to zesting and juicing my lemons and freezing the juice in a mason jar, and the zest in another container. My hands were a little sensitive later, but the squeezer Jon and I have is the best thing every for juicing! If you have sensitive hands, or simply want something worth the investment, this is it! Here it is below :)
So, I have been really impressed with how the juice and zest has kept up it's flavor. I normally would pull out the juice in the morning of the day I was going to use the juice, and just use the melted amount - which always was about what I needed.
For the zest I simply pull out the container when I begin prepping. Zest defrosts incredibly fast!
So, today I was about to use up the 2 lemons we had and it crossed my mind that my zest was low, and that I should probably zest these lemons first. Seriously, you would think I would be doing this every time I came across a lemon, lime or orange, but I have not. Yet, I am not beginning. That is what matters, right?
The moral of the story? When life gives you lemons, learn how to make the most of them. So, happy zesting to you who love the zing of citrus!

One of my favorite desserts of all times is lemon bars. While we are definitely taking baby steps in changing our health patterns (we recently began running... and have actually been doing well with exercise!), this is one recipe I will not be altering or looking for a new recipe with. This is a tried and true recipe my mom introduced me to. I plan on
Even with making my lemon bars, which my college friends love... just letting you know they are *that* good, I still had plenty of lemons left over. I looked up storing lemon juice and discovered that you can store the zest too. I love using zest in recipes, and thought this was brilliant.
So, I went to zesting and juicing my lemons and freezing the juice in a mason jar, and the zest in another container. My hands were a little sensitive later, but the squeezer Jon and I have is the best thing every for juicing! If you have sensitive hands, or simply want something worth the investment, this is it! Here it is below :)
 |
| I highly recommend you go out and buy it.. like now :) |
For the zest I simply pull out the container when I begin prepping. Zest defrosts incredibly fast!
So, today I was about to use up the 2 lemons we had and it crossed my mind that my zest was low, and that I should probably zest these lemons first. Seriously, you would think I would be doing this every time I came across a lemon, lime or orange, but I have not. Yet, I am not beginning. That is what matters, right?
The moral of the story? When life gives you lemons, learn how to make the most of them. So, happy zesting to you who love the zing of citrus!

Friday, June 28, 2013
Basil Pesto - so simple and easy!
I did not grow up being fond of pesto. I actually kind of avoided it. Then we found ourselves having a bunch of cilantro left over years ago, and I found a simple cilantro pesto recipe (to be talked about later!), and fell in love.
We have been blessed with a lot of basil in our garden. The other day Ezzie and I headed out and picked quite a bit. Our basil is still quite bushy too!
Basil will only grow during the warm months here, so Jon and I have talked about what to do with it. We eat it fresh almost daily, but we can't keep up with it's growth, and we'd like to enjoy it in the cold months too. We could freeze it, but this kind of is overwhelming to me. What is the best way to freeze basil? Will it taste ok? Will I forget we even have it and then have wasted-freezer-burned-basil? So, I'd rather make, and freeze, pesto. Weird, and maybe illogical that making a recipe and freezing it seems easier and better in my mind, but whatever - we will have pesto at our command! ;)
If you are in need/want of an easy and yummy pesto recipe, here is what we do. We love it.
Do you remember those bowls of basil? Each one will make a recipe of pesto that will work for 1lb of pasta.
 To each bowl's worth add:
- Fresh grated Parmesan 1/4 C
- Lemon zest 1/8-1/4 t
- A sprinkle of red pepper flakes (this is to your taste or heat level!)
- 1/8 t of salt (beware - it is very very easy to oversalt. You may even want to omit the salt until you are using the pesto in your dish)
I then add in 2-3 garlic cloves and about 1/4 C olive oil.


 Once done, I put a baggie inside a cup, invert the top, fill, and close!

 This little baggie goes into the freezer. Once we are ready to use it, we simply drain our pasta, place it in the pot and heat until the parmesan is bubbling. With the heat off, we then return the pasta to the pot and turn to coat. So easy, and so yummy!
The thing I like about this recipe is that I almost always have the ingredients on hand. The only ingredient that might be a miss is the lemon zest, but I froze a ton of that about a year ago, and we still use it! (It is still good :))
So, for your folks who like the recipe in one place apart from the pics, this is for you (and for me... I am one of those people :)). Even though I eyeball this recipe most of the time (who wants the extra clean-up of measuring utensils???), here is the estimated recipe for you measuring folks who love to use lots of spoons and such :)
Basil Pesto - super easy
- 1 bunch basil (or 1.5-2 C loose basil leaves)
- 1/4 C grated parmesan
- 1/8 t lemon zest
- 1/8 t red pepper flakes (more or less to taste)
- 1/8 t salt
- 2-3 cloves garlic
- 1/4-1/2 C extra virgin olive oil
Add all ingredients to a food processor with 1/4C oil. Process well. Scrape down sides if necessary. Continue processing and adding oil until everything is mixing well.
To freeze: place in plastic baggie, squeeze out extra air, close, squish contents flat and freeze!
To prepare: heat until parmesan is bubbly, and then add to your favorite pasta (1lb works for this recipe), meat, quinoa, etc.
Enjoy!
We have been blessed with a lot of basil in our garden. The other day Ezzie and I headed out and picked quite a bit. Our basil is still quite bushy too!
 |
| Ezzie picking basil. The basil is between two bell pepper plants. He is such a great picker! |
 |
| 3 Bowls Full! |
If you are in need/want of an easy and yummy pesto recipe, here is what we do. We love it.
Do you remember those bowls of basil? Each one will make a recipe of pesto that will work for 1lb of pasta.

- Fresh grated Parmesan 1/4 C
- Lemon zest 1/8-1/4 t
- A sprinkle of red pepper flakes (this is to your taste or heat level!)
- 1/8 t of salt (beware - it is very very easy to oversalt. You may even want to omit the salt until you are using the pesto in your dish)
I then add in 2-3 garlic cloves and about 1/4 C olive oil.

Then the processing begins. I add enough olive oil for a nice paste to develop.


The thing I like about this recipe is that I almost always have the ingredients on hand. The only ingredient that might be a miss is the lemon zest, but I froze a ton of that about a year ago, and we still use it! (It is still good :))
So, for your folks who like the recipe in one place apart from the pics, this is for you (and for me... I am one of those people :)). Even though I eyeball this recipe most of the time (who wants the extra clean-up of measuring utensils???), here is the estimated recipe for you measuring folks who love to use lots of spoons and such :)
Basil Pesto - super easy
- 1 bunch basil (or 1.5-2 C loose basil leaves)
- 1/4 C grated parmesan
- 1/8 t lemon zest
- 1/8 t red pepper flakes (more or less to taste)
- 1/8 t salt
- 2-3 cloves garlic
- 1/4-1/2 C extra virgin olive oil
Add all ingredients to a food processor with 1/4C oil. Process well. Scrape down sides if necessary. Continue processing and adding oil until everything is mixing well.
To freeze: place in plastic baggie, squeeze out extra air, close, squish contents flat and freeze!
To prepare: heat until parmesan is bubbly, and then add to your favorite pasta (1lb works for this recipe), meat, quinoa, etc.
Enjoy!
Subscribe to:
Posts (Atom)